Protect Your Investment: The Ultimate Van Wrap Aftercare Guide (2026)
- Usama Saghar
- May 16
- 11 min read

Your van wrap isn't just a layer of vinyl. It's a high-performance marketing engine. Every mile your vehicle travels is a chance to win a new client, but only if that wrap stays pristine. You've spent good money on a professional transformation. Now, you're likely staring at road grime and wondering if a standard car wash will ruin everything. It's a valid fear. One wrong move with a high-pressure hose can turn a strategic investment into a peeling mess.
We understand the pressure to keep your fleet looking elite. That's why we've compiled these expert van wrap aftercare instructions to help you master the art of vinyl maintenance. You'll learn how to extend the life of your wrap to its full seven-year potential while keeping colors vibrant and edges locked down. We're covering everything from the critical 72-hour curing window to the exact technical specs for safe pressure washing, giving you a clear roadmap to protect your brand's impact on the road.
Key Takeaways
Respect the critical 72-hour curing window to ensure your adhesive bonds permanently for maximum durability.
Master the hand-washing protocol and specific van wrap aftercare instructions to avoid the destruction caused by aggressive automated brush washes.
Protect your graphics from corrosive road salt and industrial fallout common across the West Midlands and major motorways.
Learn the 60-second rule for handling fuel spills and the correct way to use Isopropyl Alcohol for professional spot cleaning.
Leverage annual health checks to maintain your wrap’s conversion power and secure a 5-to-7-year lifespan.
Table of Contents
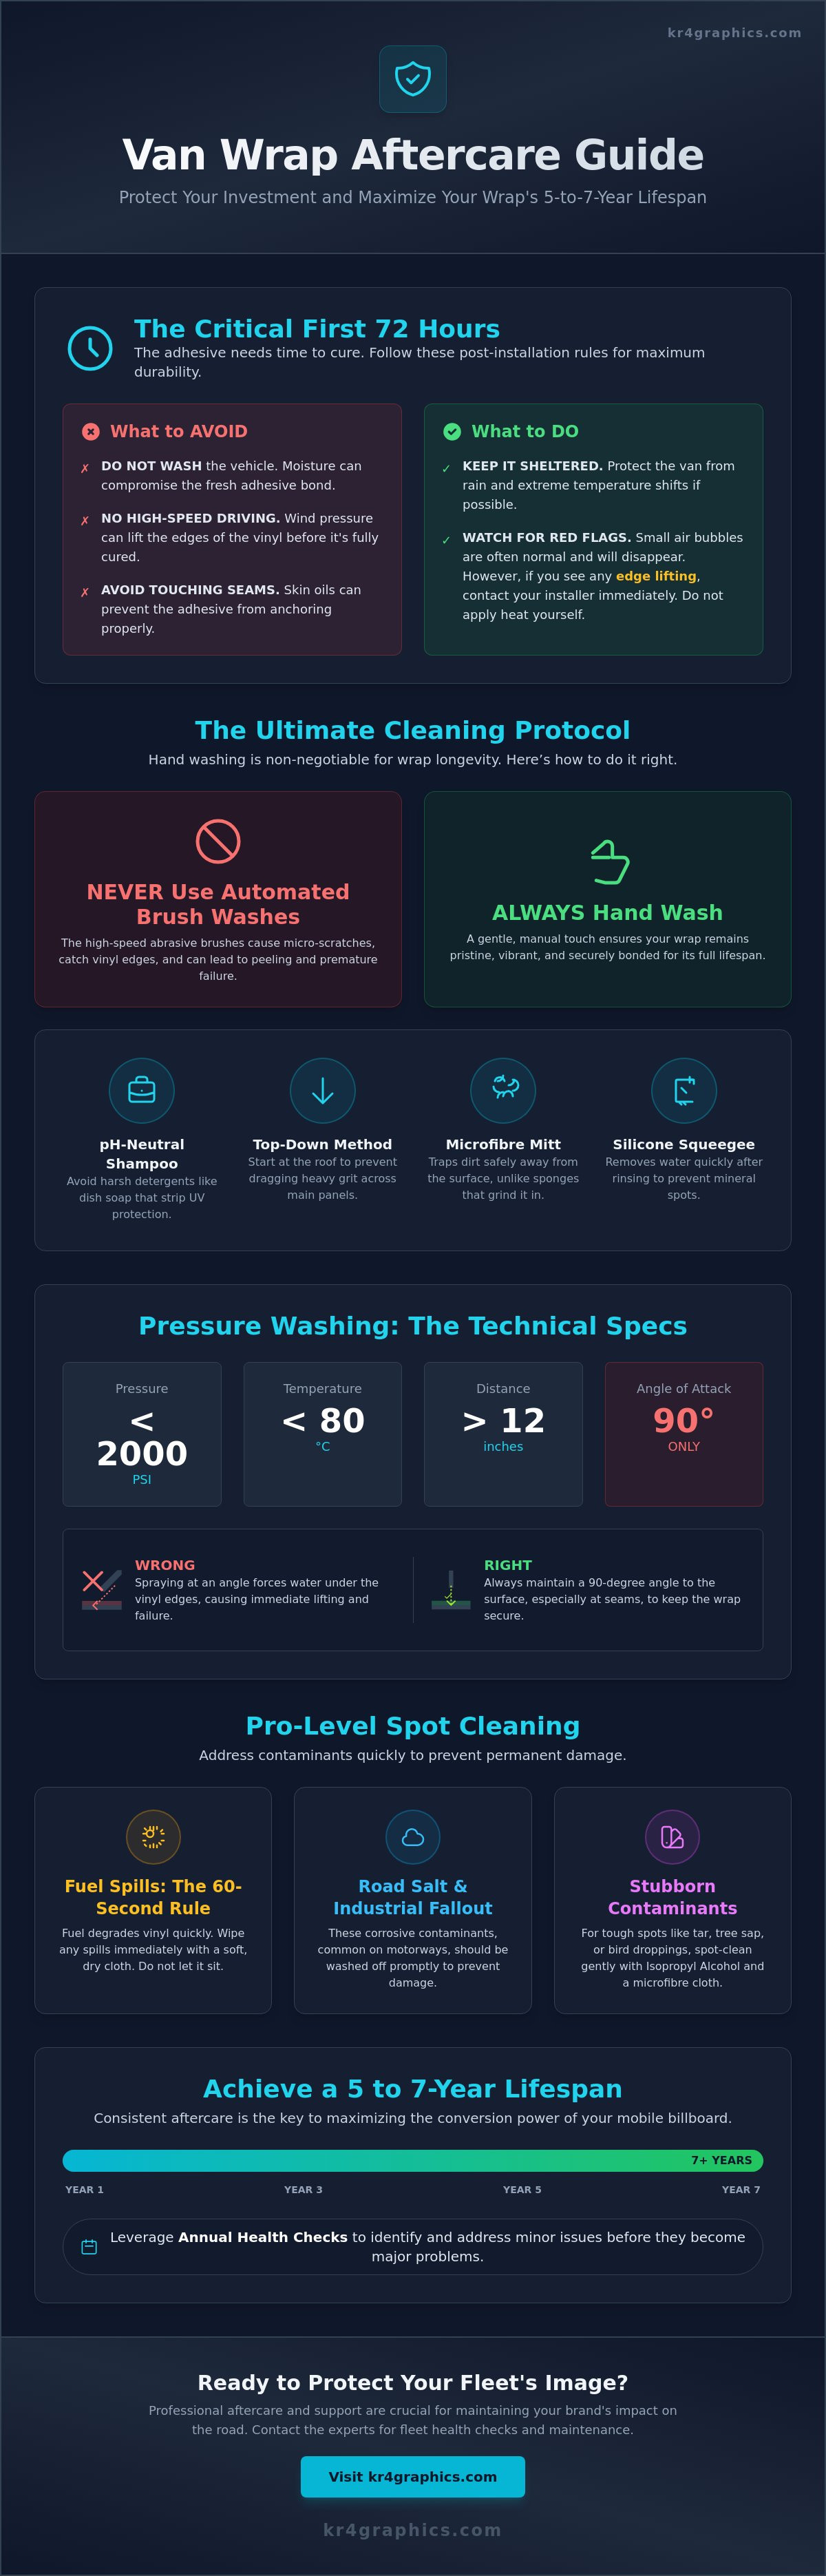
The Critical First 72 Hours: Post-Installation Survival Rules
The transformation is complete. Your van looks like a high-octane brand asset. But the next 72 hours determine whether that finish lasts seven years or seven months. Think of your new Vinyl wrap as a living material. The adhesive beneath the surface isn't just a static glue. It's a complex chemical bond that requires time, stability, and specific conditions to reach its maximum strength. Following these initial van wrap aftercare instructions is the difference between a high-impact marketing tool and a costly repair job.
Temperature is your primary variable. In the West Midlands, we deal with unpredictable shifts. A frosty morning followed by a humid afternoon creates thermal stress. If the vinyl expands and contracts before the adhesive has cured, you risk edge lifting or tenting in deep recesses. Keep the vehicle in a dry, stable environment if possible. Avoid all liquids. If it rains, keep the van under cover. Moisture is the ultimate enemy during this window. It can seep under the edges and compromise the bond before the curing process even begins.
The Curing Process Explained
Adhesion happens through heat cycling. As the vehicle moves through natural temperature changes, the vinyl settles into the micro-pores of the paintwork. This process takes roughly three days to finalize. During this time, speed is a major threat. High wind pressure on the motorway can force air under fresh edges, causing them to peel back instantly. Stick to lower speeds and local roads for the first 72 hours. Also, keep your hands off. Natural oils from your skin can transfer to the seams, creating microscopic barriers that prevent the vinyl from anchoring properly to the substrate.
Immediate Red Flags to Watch For
Precision is our standard, but environmental factors can cause movement. Watch for minor bubbles. Most small pockets of air are actually gasses escaping the adhesive; they usually dissipate within a week as the material breathes. However, edge lifting is a different beast. If you see a corner starting to curl, don't ignore it. Never reach for a hairdryer or a DIY heat gun to fix it yourself. Excessive heat can over-stretch the vinyl or burn the adhesive. Contact us immediately. Professional intervention ensures the seal is restored without compromising the integrity of the entire panel.
The Cleaning Protocol: Hand Washing for Maximum Longevity
Hand washing is the only way to ensure your full van wrap remains a high-impact marketing tool for the long haul. Automated brush washes are the primary killer of commercial graphics. They act like high-speed sandpaper. These machines micro-scratch the surface and catch the edges of your vinyl. If you want to hit that 5-year+ lifespan, you need a controlled, manual touch. It's about strategic preservation, not just a quick rinse. Professional maintenance is the catalyst for your brand's long-term visibility.
Stop using household dish soap immediately. It's engineered to cut through grease on ceramic, not protect delicate polymers. These detergents strip away the UV inhibitors built into the vinyl, leading to premature fading and brittle material. Use professional, pH-neutral automotive shampoos instead. Follow the "Top-Down" method. Start at the roof and work your way down. This ensures that heavy grit from the lower sills doesn't get dragged across your primary branding. Industry leaders at 3M provide comprehensive vehicle graphics care instructions that reinforce this gentle, systematic approach.
The Professional Equipment Checklist
Ditch the sponges. They are porous and trap abrasive dirt that swirls your finish. High-quality microfibre mitts are the professional standard. They lift contaminants away from the surface and hold them in the pile. For matte or satin finishes, this choice is non-negotiable to prevent unwanted shine or burnishing. Finish your wash with a silicone squeegee. It removes water instantly and prevents mineral spots from drying into the vinyl. Keep your water lukewarm. It's the "Goldilocks" zone for cleaning. Cold water won't lift road oils, while hot water can soften the adhesive bonds prematurely.
Pressure Washing: Friend or Foe?
Pressure washers are efficient tools for large fleets, but they require technical precision. Follow these van wrap aftercare instructions to avoid disaster. Keep the pressure below 2000 PSI. Set the water temperature under 80°C. Your nozzle must stay at least 12 inches away from the vehicle at all times. The most critical rule is your angle of attack. Always maintain a 90-degree angle at every seam. Spraying at an oblique angle against an edge is the fastest way to force the vinyl to lift and fail. Precision in cleaning mirrors the precision of the initial installation.
Fighting the Elements: Protecting Graphics in the West Midlands
The West Midlands presents a unique set of challenges for your fleet. From the heavy gritting on the M6 and M5 to the industrial fallout in Aldridge and Walsall, your graphics are under constant attack. These aren't just cosmetic issues. They are structural threats to the vinyl's integrity. Following specific van wrap aftercare instructions tailored to our local environment is the only way to safeguard your brand's visual power and long-term ROI. Your van is a tactical asset. Don't let local road conditions erode its impact.
Road salt is a silent corrosive. It settles into the micro-gaps of your vinyl edges and begins to eat away at the adhesive bond. In industrial hubs like Walsall, metallic particles from local manufacturing can become airborne and embed themselves into the surface of your wrap. This leads to "pitting" and a loss of the vibrant finish that makes your van sign writing graphics stand out. Then there is the 2026 sun cycle. We are seeing increased UV intensity that can bleach pigments in record time if left unprotected. Emergency contaminants like bird droppings and tree sap are highly acidic. They can etch into the vinyl in as little as 24 hours during peak summer heat. Don't wait for your weekly wash. Spot-clean these areas immediately to prevent permanent staining.
Winter Protection Strategy
Weekly washes aren't a suggestion; they are mandatory during the UK gritting season. Salt slurry is a chemical cocktail that thrives in the damp British winter. Focus heavily on wheel arches and sills. This is where the highest concentration of salt accumulates and works its way behind the panels. When rinsing the undercarriage, be surgical. You need to remove the salt without blasting water directly into the graphic seams at the bottom of the doors or around the rear hinges.
Summer Heat and UV Shielding
The "Park in the Shade" advice is often a myth for commercial fleets on the move. Your van is a tool; it needs to be where the work is, which is often under the direct glare of the sun. Instead of hiding the vehicle, use vinyl-specific UV protectant sprays. These act as a sacrificial layer against pigment degradation. Different finishes react uniquely to heat. Matte wraps absorb more thermal energy than gloss. This makes them more susceptible to drying out and cracking if you don't keep them hydrated with the right aftercare products. Precision maintenance ensures your partial van wraps stay as vibrant as the day they were installed.
Spot Cleaning and Contaminant Removal: The Pro Method
While Section 2 covered the weekly wash, spot cleaning is about surgical precision. It's the front-line defense against high-acidity contaminants. These substances don't wait for your weekend maintenance schedule. They work fast. If you want to keep your Full Van Wraps looking brand-new, you must master these specific van wrap aftercare instructions for emergency removal. Speed is your primary ally here. Precision is the second. Every minute a contaminant sits on your vinyl, the risk of permanent damage increases.
Fuel spills at the pump are the most common threat. Diesel and petrol aren't just liquids; they are aggressive solvents. You have a 60-second window to act before they begin to compromise the vinyl top coat or seep into the adhesive at the seams. Use Isopropyl Alcohol (IPA) for professional-grade spot cleaning. Don't pour it directly onto the wrap. Mist a 70% IPA solution onto a clean microfibre cloth and use the "Microfibre Dab" technique. Never scrub a single spot. Scrubbing creates friction heat that can distort the vinyl or create a permanent "ghosting" effect where the finish looks uneven. If you encounter stubborn residue, let the IPA sit for 30 seconds to dissolve the bond. Then, lift it away with a clean section of the cloth.
Emergency Spill Response
A spill at the petrol station can dissolve adhesive on contact. Every commercial vehicle should carry an emergency cleaning kit in the cab. This isn't fluff. It's asset protection. Your kit needs a spray bottle of clean water and a stack of fresh microfibre towels. Follow the "Water Rinse First" rule. Drench the spill area with water to dilute the chemical concentration before you even touch it with a cloth. This prevents you from rubbing concentrated fuel into the pores of the vinyl. If you've suffered a major spill that's reached the edges of your Van sign writing graphics, contact us for a professional assessment to ensure the bond is still secure.
Bug and Tar Removal
Bug splatter is highly acidic. When left to bake in the sun, it etches the surface of your wrap. This leaves permanent "scars" in the pigment. Avoid aggressive, solvent-based tar removers. These can melt the edges of Vinyl Cut Lettering or dull a matte finish. Stick to pH-balanced, citrus-based cleaners instead. Use the "Soaked Towel" trick for stubborn, dried-on contaminants. Lay a microfibre towel soaked in lukewarm, soapy water over the area for five minutes. This softens the debris, allowing it to be wiped away without any abrasive force. High-impact branding requires high-impact care.
The KR Graphics Advantage: Professional Support and Fleet Health
Mastering van wrap aftercare instructions is the first step toward long-term brand success. The second step is partnering with experts who prioritize your ROI. Our 30-year legacy in Aldridge isn't just a number. It's a deep database of technical knowledge. We've seen every environmental challenge the West Midlands can throw at a vehicle. We know exactly how different vinyl chemistries react to local conditions. This expertise ensures your fleet remains a sharp, high-performance marketing tool for its entire lifespan. We don't just install graphics; we engineer transformations that last.
Professional oversight is the catalyst for durability. We recommend annual health checks for every vehicle we wrap. During these inspections, our technicians examine every seam, recess, and edge. We look for early signs of UV degradation or micro-lifting that the untrained eye might miss. Catching these minor issues early prevents them from becoming major failures. Maintenance isn't a chore. It's a brand-building habit. A well-maintained wrap signals to your clients that your business values precision and quality in everything you do.
Why Local Expertise Matters
Local knowledge is a strategic advantage. We understand how the specific humidity and temperature shifts in our region impact full vehicle wraps. If your van suffers accidental damage on the road, you need a partner who can react with speed. Our Aldridge team provides fast turnaround times for vehicle graphics repairs. You get direct access to the people who actually did the work. No call centers. No delays. Just professional support when your brand's visibility is on the line.
Maximising Your Marketing ROI
Your van is a mobile billboard. A clean, vibrant wrap is a lead-generation machine that builds instant trust with your audience. Conversely, a neglected wrap with peeling edges or faded colors can actively damage your reputation. The cost-benefit analysis is clear. Investing a small amount of time in a proper maintenance routine is significantly cheaper than a premature full-fleet replacement. When you're ready for a brand refresh or a new campaign, we handle the removal process with the same precision as the installation. We ensure your paintwork remains protected and your next marketing phase is ready to launch. Take the next step in your brand’s evolution and Contact KR Graphics today to discuss your fleet requirements.
Secure Your Brand’s Future on the Road
Your vehicle wrap is a high-performance asset. It's built for impact. By mastering the 72-hour curing window and adopting a professional hand-washing routine, you protect that strategic edge. These van wrap aftercare instructions provide the technical roadmap to safeguard your investment against the harsh West Midlands elements. Precision maintenance ensures your brand remains vibrant and visible for the long haul. It's about turning a physical asset into a permanent lead-generation machine.
We combine 30 years of industry experience with high-octane designs to deliver results that convert. Our Aldridge-based team provides expert installation that stands up to the demands of the road. Your fleet is a blank canvas waiting for a total transformation. Don't settle for mediocre visibility. Protect your brand—get a pro wrap from KR Graphics today. We are the partners you need for professional durability and high-impact outreach.
You have the tools and the techniques to keep your graphics looking elite. Move with speed. Lead with confidence. Your brand is ready to dominate the streets.
Van Wrap Aftercare: Frequently Asked Questions
Can I take my wrapped van through a jet wash?
Yes, you can use a jet wash, but caution is mandatory. Keep the pressure below 2000 PSI and the nozzle at least 12 inches from the surface. Never aim the spray directly at a seam or edge. High pressure can force water beneath the vinyl, causing immediate lifting. Precision is the key to maintaining your brand's visual integrity.
How long does a van wrap typically last with proper care?
A high-quality van wrap typically lasts between 5 and 7 years. This lifespan depends heavily on your adherence to van wrap aftercare instructions and local environmental factors. Vehicles parked indoors or those cleaned weekly with pH-neutral products reach the upper limit. Neglect or aggressive mechanical washing will significantly shorten this window, forcing an early reinvestment.
What is the best soap to use for cleaning a vinyl wrap?
Use a dedicated, pH-neutral automotive shampoo without added waxes or silicones. Household detergents are too aggressive and strip away UV inhibitors. For matte finishes, avoid any "wash and wax" products, as they'll create an uneven, blotchy shine. High-quality detergents act as a catalyst for your wrap's long-term vibrancy.
My wrap is starting to peel at the corner, what should I do?
Contact us immediately if you notice an edge lifting. Don't attempt a DIY fix with glue or a hairdryer. Dirt and moisture will quickly settle behind a loose corner, ruining the adhesive bond for good. We can often trim or reseal a minor lift if caught early, protecting the integrity of the entire panel.
Can I polish or wax my wrapped van?
You shouldn't use traditional abrasive polishes or carnauba waxes on a vinyl wrap. These products can trap heat or scratch the surface. Matte and satin finishes require specialized, non-gloss enhancers. For gloss wraps, only use spray sealants specifically designed for vinyl to add a layer of UV protection without the risk of clouding the finish.
How do I remove bird droppings without damaging the vinyl?
Remove bird droppings as soon as you spot them. The high acidity can etch into the vinyl top coat in under 24 hours. Soak the area with a wet microfibre cloth for several minutes to soften the deposit. Gently wipe it away without scrubbing. If staining remains, use a 70% Isopropyl Alcohol solution to lift the residue safely.
Is it safe to use a snow foam lance on a vehicle wrap?
Snow foam is highly effective and safe for wrapped vehicles. It provides a touchless pre-wash that lifts grit before you touch the surface with a mitt. Ensure the foam is pH-neutral. This method is the professional standard for preventing swirl marks and maintaining the tactile quality of your graphics over several years.
Will constant sun exposure fade my van graphics?
Constant sun exposure will eventually cause pigment degradation. Horizontal surfaces like the bonnet and roof take the most impact from UV rays. You can mitigate this by applying a vinyl-specific UV protectant every few months. These products act as a sacrificial shield, ensuring your brand colors remain high-octane and punchy even in peak summer.


Comments